Terms
- AMS= Alarm Management System
- OPC = Open Platform Communications
- TEG = Teldio Edge Gateway
Installing the OPC Client for MQTT
To get started with setup contact download the OPC Router software from the link below:
The OPC Client application needs to communicate through the localhost and must be installed on the same computer that will have the OPC Alarm server installed.
Once you have downloaded the file, unzip the files to the target computer and run the application executable to begin the installation. Please note that you may need to install the prerequisites listed in the README.txt file in the install package.
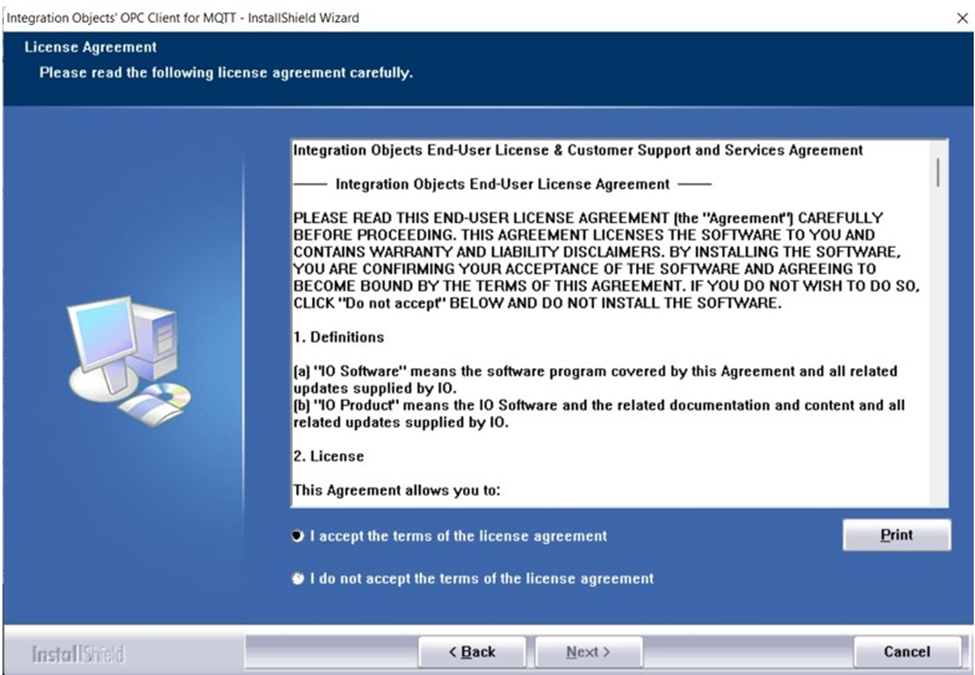
Accept the terms of the license agreement and complete installation wizard prompts to finish the install.
Once you are finished the installation, you will need to locate the following application in your start menu. Then, right click on it and select “Run as Administrator” from the displayed menu.
Start/Programs/Integration Objects/OPC Client for MQTT/OPC Client for MQTT License Authorization
Check the “Activate” option for the installed feature and then click the “Generate” button to generate a User ID.
Email the User ID to support@teldio.com and we will initiate the process to retrieve an activation code for your system.
This software comes with a 14-day trial and you will be able to complete the full installation while waiting to receive the activation code.
Using the OPC Client for MQTT

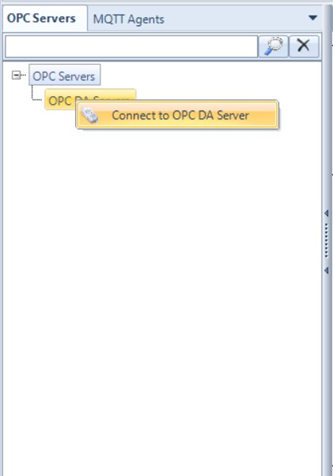
Once you have opened the application, you will arrive at the OPC Client dashboard. To use this client, you will need to configure an OPC Data Access Server. Right click on OPC DA Server to connect to a DA server.
For the purpose of demonstrating what a connected server looks like on this application, we will be using the Matrikon Simulator as the OPC DA Server.

Select the server and click connect to register the server on the OPC for MQTT Client.
We can now select the OPC Server and add specific groups to that server.

A group is a category of information that you would like to pass separately from other data. For this tutorial, we will create a security group where all security data will be passed. Right click on the server and click Add Group.

Name the group and the rate at which you would like it to send alerts/alarms. Select apply to configure the security group.
All detailed information about 'Add Group' General Properties will be found at the end of this document

Now that a group is added, you can now add an item which is specific to the data you would like to pass to the group.

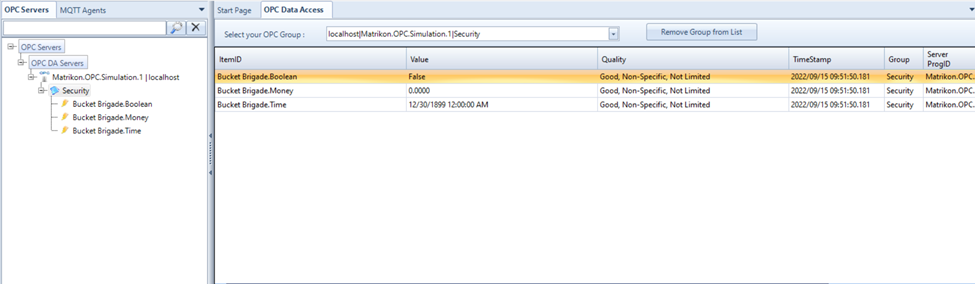
For a demonstration, I selected three data items from the Bucket Brigade OPC Item list that will be used as data inputs for the Teldio Edge Gateway.

Drag the items to the right and click apply and the items will be configured in the security group and ready to send information to the Teldio Edge Gateway.

The items selected will have a dashboard that shows the current values and timestamps of the data. These items will be what the TEG will listen for over MQTT service.
Connecting OPC Client to Teldio Edge Gateway
Now it is time to configure the OPC Client to speak with the Teldio Edge Gateway. Go to the MQTT Agents tab and we will configure the TEG as a Data Access agent.

Right click on DA MQTT Agents and it will allow you to Add New Agent.

This MQTT Agent Wizard will appear, you can name the agent what ever you like and make sure to always select the latest protocol version and click next.

Select the group that you want to use to send data to the TEG, this group would be the Security group we created for the DA Server. Click next to continue with the configuration.

The MQTT Broker address must be set to the same Ip address as the TEG and the port must be set to 1883. Choose a name for the topic, that will relate to the information being sent. QoS must be set to 2.

Verify that you information is correct and click the finish button to install the TEG as a DA Agent on the OPC Client for MQTT.

The red icon signifies that an MQTT Agent has been successfully configured. The icon will turn Green when the Agent is connected to the server. For the TEG to connect via MQTT to this OPC Client, we will need to activate the MQTT broker module on the gateway.

Log into the TEG using the web interface. Navigate to Settings/Add Module and in the search bar type in MQTT. The first option should be MQTT Broker, click the ADD button and the MQTT Broker module will be available under the modules section.

Enter a name for the TEG MQTT Broker and click save. No information in configuration is necessary.

Return to the OPC for MQTT Client application

Right click on the Agent tab and click start to connect the OPC Client for MQTT with the Teldio Edge Gateway.

Once you see the green arrow appear, you will know that the connection is successful.
If you did not get a green arrow, please refer to the troubleshooting steps at the end of this document
Now that all systems are connected, we will do a demonstration of the OPC Client for MQTT generating alarms on the Teldio Edge Gateway.
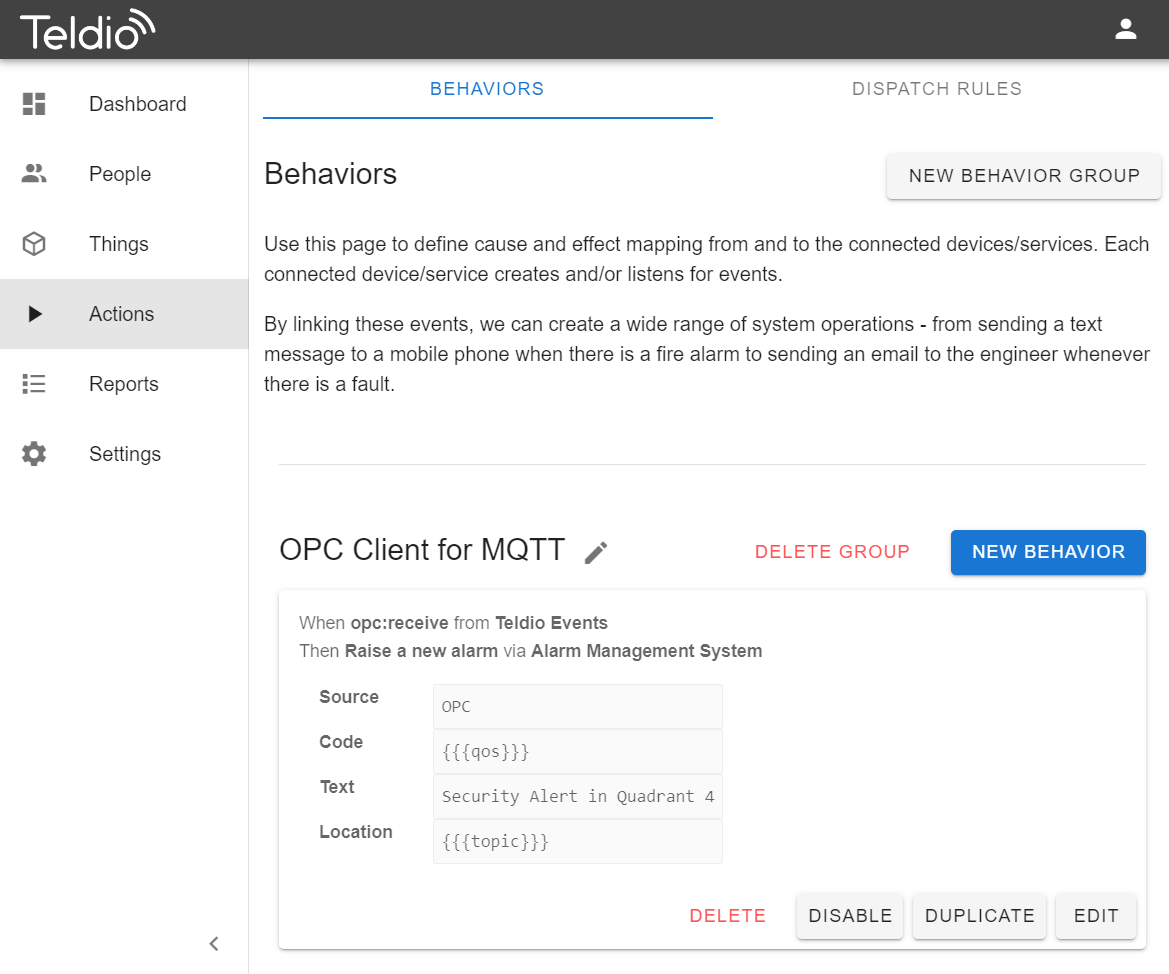
Navigate to the Actions menu on the TEG and click create a 'NEW BEHAVIOR' that will allow the gateway to recognize the incoming information from OPC Client for MQTT.

The Trigger will be set to Module: Teldio Events, Event: opc:receive. This will have the Teldio events module scan incoming information from any MQTT source. Click continue

The Action will be set to Module: Alarm Management System, Event: Raise a new alarm. This will have the AMS module output any received data over MQTT to the alarm dashboard. Click continue
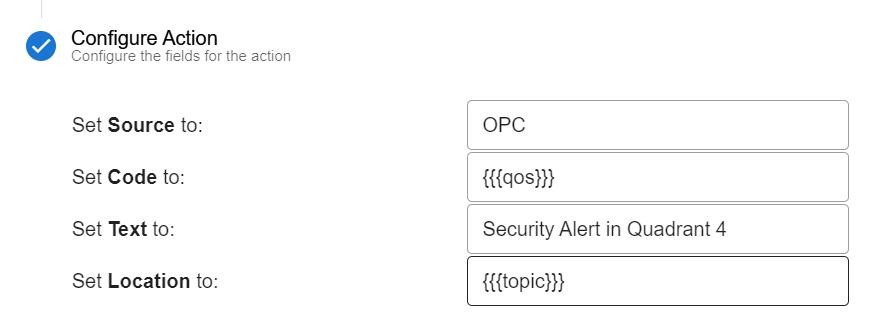
The Configure Action information will be configured to Source: OPC, Code: Data from Trigger = qos, Text: Security Alert in Quadrant 4, and location: Data from Trigger = topic. This will set the behavior to label the incoming MQTT communication as OPC, display the qos information, display the text 'Security Alert in Quadrant 4', and it will inform you that it was received from the security group. Click Save to install this behavior. Your configured behavior will be saved and automatically activated in the behavior menu.
* The above configuration is just for demonstration purposes. We will help you parse data and configure the alarms to your liking.*

Navigate back to Dashboard and click on the Alarms menu to the right.

The Active Alarms dashboard will appear, and we will be able to see all incoming alarms from this view.
On you server, if you trigger an alarm the value will update to the current state of the alarm tag. For example, I triggered the alarm for Bucket Brigade.Boolean and its value changed from False to True.
 Below is what the alarm would look like on the Teldio Active Alarm Dashboard when the Boolean value changes from False to True:

Using the OPC Client for MQTT, you will be able to relay a variety of alarms originating from your server to the TEG Alarm Dashboard. We will assist you with parsing data and tailoring alarms to your liking.
If you want to send to the radio, through SMS, email or other mediums, reference the Teldio TEG Configuration Guide.
'Add Group' Detailed Information
General Properties
- Group Name: The name must be unique among the other groups already created in the OPC Server.
- Update Rate: specifies the fastest rate at which data changes for this group may be sent by the server. Passing 0 indicates that the server should use its fastest available update rate. The update rate is specified in milliseconds.
- Dead Band: is the range through which the input may be varied without initiating a response. It specifies the change percentage in an item value that will cause a notification of this value to the OPC client. A 0.0 value indicates all changes to be received.
- Time Bias: The purpose of the TimeBias is to indicate the time zone in which the data was collected. Enter 0 to use the default system TimeBias.
- OnDataChange (for OPC DA version 2.05 and higher): the data will be collected asynchronously on report by exception basis.
- Synchronous: the data will be collected by performing periodic synchronous read operations to a server. There are two types of read source: o DEVICE: Reading data from device. o CACHE: Reading data from cache.
- Asynchronous (I/O 2.0): the data will be collected by performing periodic asynchronous read operations to an OPC DA version 2.0 or higher compliant server.
Write Mode: indicates the write mode to be used for the group. There are 4 write modes:
- Synchronous: allows the OPC client to send synchronous write requests to the OPC Server.
- Asynchronous: allows the OPC client to send asynchronous write requests to the OPC Server (for OPC DA version 2.0 or higher).
- Synchronous IO2: allows the OPC client to send synchronous write requests to the OPC Server (for OPC DA version 3.0).
- Asynchronous IO3: allows the OPC client to send asynchronous write requests to the OPC Server (for OPC DA version 3.0).
- Synchronous IO2 (WriteVQT): allows the OPC client to send synchronous write VQT requests to the OPC Server (for OPC DA version 3.0).
- Asynchronous IO3 (WriteVQT): allows the OPC client to send asynchronous write VQT requests to the OPC Server (for OPC DA version 3.0).
Additional Information / Troubleshooting
If you receive an error message when attempting to connect to the DA MQTT Agent, please check the following:
- Check that the IP address is correct, and that it is the same address as the TEG.
- Check that the port is set to port 1883.
- Check that the TEG is on the same local area network.
- Check that your TEG has the MQTT Broker Module licensed and configured.
- If all above are checked and still unable to connect, please contact support@teldio.com.